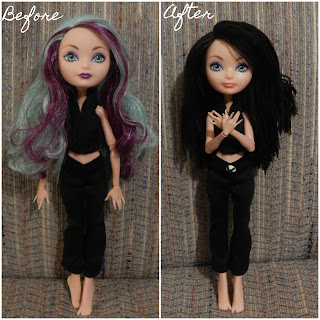
As promised, here is a detailed post on how I made a custom X-23 doll out of an Ever After High doll for my friend. :)
 |
| The doll used was a Madeline Hatter doll from Mirror Beach, found at Goodwill for only $1. |
 |
| A closeup of her face and hair. :) |
 |
| The first thing I did to start this custom doll was to make the outfit. It's basically just a simple black tank top that secures in the back with velcro and a pair of black pants. (I haven't figured out how to make shoes for these dolls yet!) |
 |
| Then I cut off all of her hair. I'll admit it was hard cutting off all of that lovely hair, but it was worth it I think. Then after cutting it as short as possible, I used a pair of tweezers to pluck out all the little hairs. That part definitely took a while and my friend did the majority of the the plucking. Also while dealing with the hair, I took the head off so it'd be easier to get the hair off. It was a little difficult to take the head off, but it's easier to take it off than to put it on! |
 |
| And after a while, we finally got all the little hairs out! |
 |
| The next step was to remove the paint at the top of the head with Nail Polish remover. I used a remover with 100% Acetone and removed the paint with a few Q-tips. |
 |
| Next I made the wefts of hair using brushed out and straightened with a flat iron brown and black yarn. After brushing all the hair out, I used Tacky Glue to glue the hair together to make wefts, and after those dried, I glued them onto the head. This process definitely took quite a few hours! |
 |
| The last thing I did was remove her lips using the same nail polish remover and repaint them using some red pastels. I sealed it in with a sealer spray that I use for art. I can't remember what brand it is, but it's made out of milk products or something like that. It took probably 3 coats of spray and layering the red pastels before I was finally satisfied. Using pastels to repaint the lips was definitely a bit messy, but I much prefer how soft it looks to the way painting with acrylic paint would look. |

And that's pretty much it. We still need to find away to make her claws and shoes, but besides that this custom doll is done. I'm sorry I wasn't able to get all that many pictures, but I tried my best to document the process as best I could. I hope you enjoy this custom X-23 doll!
 As promised, here is a detailed post on how I made a custom X-23 doll out of an Ever After High doll for my friend. :)


Comments
Post a Comment
Please keep your comments related to the blog's content.
-No foul language or cursing.
-Nothing inappropriate